Thursday, October 31, 2013

Facebook to study your mouse cursor movements

Be The First To Comment
Facebook after giving more better options like displaying less unwanted ads on News Feed, launching of Deep Learning technique, etc for advertisers to improve their ads, now has announced that it will track users' mouse cursor movements. 

You may think that what is the main intention behind this change. Basically Facebook wants to study how you behave with any ad on your News Feed. Whether you hover over to know more with tool tips or think for some time before clicking on it. 
How a user behaves on screen when any ads are placed or any image containing ads are displayed will be tracked by Facebook. When ads are displayed on the News Feed, sometimes users feel it is interesting and would want to know more about that ad, the user will move the mouse cursor to hover over the ad and wait for some time. 

For how many seconds or minutes your cursor hovers over the image or any photo will be tracked by Facebook. 

Also before clicking on "Like" option below any photo, what your mouse cursor does is also known. By this the behavior of the person using will be known. 
Till now Facebook has studied your clicks, likes and comments, to make some improvements in the ad placements and better ad products. To make it more better, understanding users' mind is important. And hence the use of special technique of "mouse cursor" will decide. 

How you hover your cursor over any advertisement and if you click on it, then what your cursor does will be evaluated for making more engaging News Feed layouts and ads.

Purely to study the behavior of its users for "AD related" images and photos, this technique will be used. Facebook users' personal data will not be tracked or used. The main intention behind this will be to improve the ad campaigns, ad images and ad placements.

Facebook Home app for Android users get four new additions - Flickr, Instagram, Tumblr and Pinterest

Be The First To Comment
Interesting change and addition in Facebook Home!! According to the Facebook newsroom, four hot new photo sharing sites added to Facebook. The new additions in Facebook Home are Flickr, Instagram, Tumblr and Pinterest. Today, it was announced by Facebook, that this feature will begin testing within "Facebook for Android Beta" version.

There was a new update related to Android's Facebook Messenger app this month. So two new updates for Android users.


When you wake up in the morning and swipe Facebook Home app, with that now you will get these four apps to swipe through and get along. Now swiping through photos from Facebook Home app with Flickr, Instagram , Tumblr and Pinterest.


To get this facility, you need to update both "Facebook for Android" and "Facebook Home for Android".


So now with Facebook Home app, get the latest photos from four added sites. 


Wednesday, October 30, 2013

"Facebook Messaging" on Android now with a fresh look and experience

Be The First To Comment
Android users will get an updated Facebook experience with a fresh new look and new items added. 


 What will the updated version present to you

  • To reach friends faster on mobile apps. You can make out with a "Messenger" icon besides the friends' name which relates to the fact that he / she is using Facebook app. Things will be faster in terms of messaging and chatting. 
  • Messaging your non-friends is easier. Your mobile phone contacts may not be your friends in your Facebook account, but you can now message them too with this latest update.
  • A fresh new look
  • Scroll across the top of the app or swipe left and right to see recent conversations and also the list of people whom you messaged.


 What more you will get
  • Photos will get two times faster than previous app
  • It will be easier to share photos, view comments and edit captions
  • View photos with the tags
  • Notifications and messages will be at the top of your screen
  • Menu will appear at the side with items like Groups, News Feed, Apps , Games, etc

To get the app, you need to download the latest app from "Android Market". 
 
 
This update will be first tested on with few people and then will be on the floors. 


Tuesday, October 29, 2013

Add your Geo-Location using "Google Maps" in Contact Tab of Fan page

Be The First To Comment
Business fan pages need a tab for customers to contact them whenever needed. In that case, creating a "Contact Tab" and adding "Google Maps" link is the best way. 

Your fan page will specify your contact details like email and contact number. But to get the geo-location on fan page will be a great way to show map of your exact location. 


Prior to adding Google Maps in fan page, first you have to add "Contact Tab" to your page. To do so: 

  • Go to "Contact Tab" app from Graph Search
  • Now select "Add to your fan page" button 

  • Choose your fan page from the list and hit "Add Page Tab"
  • Now click on "Google Maps" option . Note that the link to Google maps is available in the following sentence: "You can easily show your contact information and business location through Bing or Google Maps."
  • Type the location of your business center in the box and press Enter
  • The location will be flagged in the map besides. 
  • Now click on the "Link" image, i.e.  at the left side. You will get the link to that location on Google maps. 
  • The link to your location on Google maps will be displayed besides on the map. Copy the link of HTML 
  • Now go to your fan page and click on the "Contact tab" to embed this HTML link
  • Paste the link and click "Save Application"
 After completing the full process, your map with the exact location will be flagged when you click on "Contact Tab". 


How to create an "Online store" in Facebook

Be The First To Comment
A good news for sellers and advertisers. Now you can create a online store in Facebook with the help of "StoreYa" app in Facebook. 

 
With this app, you can create your Facebook store and start selling today. 


The main feature of this app is it lets anyone to create a Facebook store without the use of third party applications. 


The benefits of StoreYa's app are : 
  • Increase fans 
  • Sell directly on Facebook
  • Engage with your fans
  • No coding required
  • One click inventory importing possible
  • Supports more than 20 platforms like Ebay, Paypal ,Esty, etc
 The steps to create an online store in Facebook are : 

  • Open www.Storeya.com on the separate tab in your browser
  • Sign up using your Facebook account
  • Choose "Paypal" as your preferred platform
  • Create "Categories" 
  • Upload products 
  • Set checkout settings
  • Now connect your store to Facebook
 
 Note: Before setting up your online store, create your Paypal account. 


Facebook lets users to create their "Cartoon" images using "Bitstrips" app

Be The First To Comment
A new app in Facebook, "BitStrips", lets its users to create their cartoon images. A cartoon version of their own image in Facebook.


This app allows its users to create , design an avatar, with adjustments for hairstyles, clothes and other elements. 

It is the new way to interact with other friends.

Monday, October 28, 2013

How to engage your "Fans" in your fan page by creating "Forums"

Be The First To Comment
A professional fan page needs as many tabs as possible for engaging their visitors. Fan pages are meant to get more fans and viewers for your product.
 
As "online marketing" is becoming more and more advanced today, one should know every bit of the marketing in your fan pages. 

Your service or product as it needs custom tabs like welcome tab, recent tweets, LiveChat tab, form tab, Quiz tab etc, it also needs a tab that can engage your visitors to post their views and know about others. That is called as "Forum Tab"


In forums, you can make a platform available where your fan page visitors will get a chance to say something about it and get others' opinion.This is nothing but creating a "Discussion board" in simple terms. 
 
 
For creating a forum or a discussion platform for your fans, app called "Forum for Pages" is used.


Main features of this app are: 

  • Threaded discussions
  • Deep linking
  • Page owners can post as their page
  • Users who post in the forum are allowed to edit their posts upto 2 hours after posting in forum
  • Posting is restricted to fans only 
  • Search for a specific topic
  • Anyone can link to the post
  • Available in different languages like English, French, Spanish, Swedish and Italian
 
To create a Forum in your Facebook Fan Page: 

  • Log in to your account
  • Type "Forums for Pages" in the Graph Search
  • Select the page from the list below
  • Click on "Add Page Tab" 
  • You can see now that the page is asking you to create a "New Topic" 
  •  Click on "New Topic" and now enter the topic title and description or a simple question to start. 
  • And now hit "Post" 
Now your forum's first discussion topic is posted. Visitors when they will arrive they will enter their answers or thoughts.

Inform your visitors that you have created a forum section in your fan page for forums to start slowly.


Sunday, October 27, 2013

How to create "Landing page" in Facebook fan page

Be The First To Comment
In Facebook, you can have an option of letting visitors directly find more about your product in your original website. To make them find out something extra about your product or fan page, you can add a "Landing page" to it. 

What exactly is a Landing page? 
As the name suggests, it is a web page that redirects your visitors when they click on it to your original page which has more information. 

It is used more for giving other information about your fan page or a specific topic. When you add this page to your fan page, your fans will get an extra information for which they are searching for. 


The key ingredients in a perfect landing page are : 
  • Perfect title with interesting headlines
  • Perfect images and videos
  • More features about your products that are listed in fan page
  • More social icons
  • Testimonials 
  • Uses for your viewers 
  • Your personal experience


 Facebook fan pages can add Static iFrame tabs for creating such type of landing pages. 


To create a "Landing Page" tab in your Facebook Fan page: 

  • Log in to your Facebook account
  • Type "Static iFrame" in Graph Search
  • Click "Add tab" button
  • Select the fan page from the drop down list
  • Click "Add " 
  • You will arrive at your fan page with the new tab added to your page. 
  • Click on the down arrow to edit the settings of tab
  • Click on the tab. In the new window, select "Edit Tab" option
  • Choose new tab by clicking on "See More Apps" option 
  • Choose "Website" tab from the list of tabs 
  • Click on "I Understand , lets go" option to continue when you are embedding your website as a landing page tab in Facebook fan page
  • Now enter the URL of your website in the box provided.
  • After this step, your website will be displayed on the screen. 
  • Don't forget to add your website link or URL that starts with "https://" and not "http://". This is for securely adding your site as the tab. 
  • Now you can go to your fan page where the tab is added. Click on the tab and the landing page of your website is added here. 


Finely adding many tabs improves the health of your fan page and your website too.


    Facebook Apps on Android & iOS devices will display "Video Ads"

    Be The First To Comment
    Facebook recently introduced "Auto Play" videos feature in News Feed last month, now has come up with a new direction for ads. That is "Video Ads" which will be available in Facebook Apps on Android and iOS devices. 

    Videos will be coming to mobile apps in ad products.  It will give you ti install ads option, making the advertisers to make more money based on CPA (Cost Per Action). 


    According to Radu Margarint (Facebook's Software Engineer), "Video creative has proven to be an effective way to drive engagement in news feed, and we look forward to helping developers use their video creative to find new app installs".
     
    Previously these ads were displayed only in text and images format, now the advertisers will get a fairer chance to display video ads. These video ads will not automatically play in the mobile app news feed, the user has to tap on it to play. 


    Saturday, October 26, 2013

    Tip #28 - How to : Create a secret Facebook group

    Be The First To Comment
    secret facebook group pic
    I suppose most of you have already created a Facebook group or belong in one. But, did you know that you could have a secret group that only you and some people you choose could view, making it secret? Let's see how to do this below.
    Follow these steps:

    1. Log into your Facebook account.
    2. Create a group by clicking on the "Create Group" button on the left side menu.
    3. After you've finished creating the group, it's time to make secret.
    4. Click the gear icon on the top right of the group and select "Edit Group Settings".
    5. Choose the privacy otion you want under the Privacy section. You can choose between Open(anyone can see and join the group), Closed(anyone can ask permission to join the group or can be invited by a member) and Secret(the one you want; anyone can join if they are added; only members can see the group).
    6. When you are done, click "Save".

    Remember: When your group hits 250 people, you can only change it to Closed or Secret if it's Open, or Secret if it's Closed! That's the last time you'll be able to change the group's privacy settings.


    Comment below and have fun.

    Friday, October 25, 2013

    How to "Untag" yourself from a Facebook comment

    Be The First To Comment
    Tagging feature in Facebook lets you flag someone in your posts and comments. When you "Tag" your friend, actually it means you are creating a link to their timeline. With this effect, they get informed about their flagging in your posts. Another way to inform him or her that you are mentioned in one of your posts. 

    Many a times there are some spam applications or fake profiles in Facebook, that tag you even when you have not added them in your friends list. This is a spam and a serious issue that should not be ignored. 

    Immediate actions will clear spams. 


    To "Untag" yourself in other fake profiles and in their posts, follow these simple steps: 

    • Go to your Timeline
    • Select Activity Log
    • Click on "Posts You're tagged" option
    • Select the post or comment you are tagged 
    • Hover your mouse cursor to the right top and click "Edit" 
    • Hit "Report / Remove Tag" option

    This will remove your tag and will not allow the spam posts to tag you henceforth.

    These easy steps will "Untag" yourself from getting tagged in fake profiles and friends. After untagging yourself, just check for any fake profiles or friends are their in your friends' list.


    Facebook trick: View your comment made on a post which has 1 billion comments

    Be The First To Comment
    Facebook lets you like, comment and share for any post you really find interesting. If that post is really a good post then many Facebook users will automatically will comment on it. Commenting will make it more popular post and everyone will find it why it is so popular. 

    At the end, that post if gets more than 1 billion comments and you have also commented on it. Can you find your comment later when you are searching for yours out of 1 billion comments? 

    The steps that you will take for searching your comment is clicking on "View More comments" option below. But will that option display your comment! Yes if it was the recent one it will definitely display. Moreover "View more comments" option display the next 50 comments and so again you will have to click for that option to search. It is a tedious, time consuming and tiring process.

    At that time one option strikes in our mind is "Google". But Facebook has comments and there is no link between your comments in Facebook and Google Search. It is just a weird thought.

    But there has to be a solution for finding comments in the heap of comments. 

    The best Facebook trick that works in a fraction of a second for finding comments is using "Binary Search".


    The steps for finding your comment are :

    • Log in to your Facebook and go to your Timeline 
    • Go to the time of your comment from the activity log and click "Comments"
    • Go to the post on which you commented
    • Press on the time and date 
    • The URL will be   https://www.facebook.com/{page}/posts/{postID}?comment_id={comment_id}&offset=0&total_comments=1000000
    • You are looking the offset for your comment. As you know it should be between 0 (lower bound) and the number of comments (upper bound, In this case 1 000 000).Offset 0 means the newest post and 1000000 is the oldest post (in this case).


      • Now suppose L denotes the lower bound of offset, U denotes the upper bound and M half way between L and U. The equation (M=(L+U)/2) will solve. 

      • Next remove the comment_id from the URL and change the offset to M. 

      • Then look at the time on the comment there and compare it to the time of your post. 

      Note : If your post is older then the offset is low, if new then offset is high. 

    Some find it difficult in finding how to solve this equation. Then finding your comments using "Activity Log" is the best option for them.


    Thursday, October 24, 2013

    The correct way to find out Facebook Fan Page ID

    Be The First To Comment
    When you create a "Fan Page" in Facebook, FB gives a unique id for it. That id is different for different page. 

    That unique id is created by default in Facebook and when you change the name of the Fan page, it gets hidden. Means that the name appears of the page when opened but the unique id is not seen. 

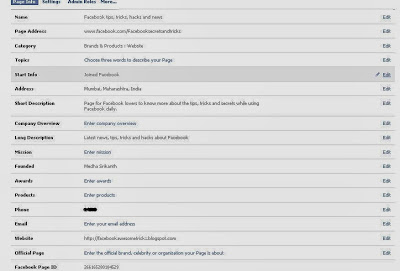
    The simple way to find out your Fan page id is: 

    • Click on the Fan Page "Edit Settings" option
    • Select "Page Info" tab, the first tab that appears when you open settings
    • Below of the screen you can see the "Facebook Page ID". That is the one you were finding out
    In the above image, the id is of my fan page "Facebook Tips, tricks, hacks and news".  You can find out for your page id from your Facebook account.


    How to add "LiveChat" for Facebook fan page

    Be The First To Comment
    Social media is helping business to flourish online upto 70-80% today. With the rise in the social media websites popularity people think to gain more online presence and customers using some great tactics and tricks. The tricks for converting visitors into customers is the main kick behind all advertising. 

    In social media, Facebook wins the first position and hence businessmen and advertisers use Facebook to advertise more. 

    Facebook advertising methods are changing every now and then. Advertisers use different options to get valuable customers to their business. Recently, Facebook launched a new tool, "Stories to Share" for media sites to buzz the happening ads besides their fan pages. 

    When there is a Facebook fan page, likes, share and comments are expected from the visitors. If this is not seen the advertisers think that there is something that is lacking for getting customers. Sometimes not only likes and comments matter, but what is actually the reaction of people buying their product or service is also important. This makes them to improve their product and other possible offers that they can use. 

    With the reaction of people, again if there are customer grievances, there should be a customer support availability on their fan page. Or else something like "LiveChat" application.

    Why "LiveChat" app :

    • Mainly to easy contact with customers
    • Improve customer satisfaction by getting their feedback
    • Support when they are in a need of it for knowing more about your product
    • Get more fans 


    If you have your Facebook fan page with just links to your website and some videos, that will not work out for your business. If you want to gain more visitors and customers, you have to gain their hearts by satisfying them.


    To your Fan page, if you want to add "LiveChat" app, then do the following: 

    • Log in to your Facebook account
    • Type "LiveChat for fan pages" in the Graph search box
    • Click on the app 
    • Now click on the button "Add LiveChat to your page"
    • Select the fan page from the drop down list to add the app
    • Click the button below to add
    • Now go to your fan page and hover over to the tabs 
    • Click on the drop down arrow which will enable you to edit the settings of any tab
    • Select the app to edit the settings
    • Enter email and API key for your LiveChat app
    • Click "Activate"button
    This will activate your LiveChat app on your Facebook Fan page.


    Trick to convert "Facebook Fan Page" to PDF file

    Be The First To Comment
    A professional Facebook Fan Page consists of all the necessary ingredients to increase its fan base. When it is so professional and has a lot of genuine fans who visit your page for something new, then better to keep a copy of it in the form of a file. The fan page can be converted to any type of file online. 

    The need for converting any fan page into a file format like document or PDF, is to keep the important information with you and you can distribute to others who are unknown about your fan page. Then sometimes it becomes a priority to send the file by emails. 

    By sending emails to other Facebook users, lets you gain some more online presence and gain popularity for your fan page. 


    To convert your fan page to PDF file, the steps are : 

    • Copy the URL of your Facebook Fan page and keep it aside on a Notepad
    • Open a new tab in your browser and enter the URL "PDFmyUrl.com". This is the website where you can convert any Facebook fan page or any website to a PDF file. 
    • Now paste the copied URL of your fan page in the text box and then hit the "P" button.
    • Wait for few seconds. The process of converting your page into PDF is going on. 
    • After the process is completed, you will get a pop up box to save the file. 
    • Save the file 
    To test whether your fan page has converted into PDF, just open and look at the file.


    In these simple steps you can convert any fan page to PDF file and use it whenever necessary.


    How to create an "Event" in Facebook

    Be The First To Comment
    Planning to "Host" an "Event" and want it to be successful online too? Social media platform like Facebook is the best place to create and host an event. 

    You can create events based on the type of event. If there is a birthday party or a marriage invitation or any party of successfully completing 20 years in your office, etc, you can arrange an event based on them. 


    In Facebook, to create an event: 

    • Log in to your Facebook account
    • Go to your Timeline
    • Click on "More" tab and select "Event" 
    • Then click on "Create Event" button 

    • When the dialog box appears, fill in the required details 
    • Select the "Invite friends" option and then click "Create" button
    A very simple method to send an invitation to your friends and family for any party or event. 


    Note: while creating an event, you have to choose the Privacy option that lets you choose either friends or guests of friends option. This option will let you invite a big audience to attend. 


    How to add "Like Box" or "Fan Page" widget to your blog

    Be The First To Comment
    What is the main intention of creating a "Fan Page", of course to get more visitors to your page and subscribers who can directly visit your fan page instead of searching your blog in Google. And moreover if your blog is not in the top of the Google Search Results, then it is difficult to get readers to your blog. 


    When you create a blog or a website, it should be well optimized and well updated with fresh content. Again here "Search Engine Optimization" will be a major task to do so. If you want good amount of visitors to your blog, then using some social widgets will definitely get required results. 

    If you have a blog then SEO is needed to bring  it on the top of Google. If you are unaware of deep knowledge of it then adding a simple widget in your blog will bring some good amount of visitors. Again the promotion of your fan page is necessary to make them aware of your page that it exists. 

    There are different types of social plugins available in Facebook that you can use for blogs and websites. One of them that is used widely by bloggers and website owners is "Fan Like Box" means a like box which displays the name of the fan page and how many visitors have liked your page. 

    Today, your online presence is judged by how many likes and how many subscribers to your page in Facebook. 
    To get the widget of your "Fan Page" in Facebook, you have to follow these steps: 
    • Log in to your Facebook account
    • Go to "Developers" page in Facebook. 
    • The list of plugins are displayed
    • Select the "Like Box" plugin 
    • Now you need to get the code that has to be embedded in your blog. To get the code, enter your fan page URL in the box provided (See image below)
    • Then select the boxes of your choice if you want to "Show the Friends' faces" and other options if you want to display in the like box widget on your blog
    • Likewise the preview is shown below of the screen when you make changes 
    • After all things done, click on "Get Code" button
    • And you will get the code. Copy it. 

    Now the next step is to add the widget in blog.


    In your blog, if you are using "Blogger.com", 

    • Go to "Layout" tab
    • Select "Add a Gadget" option 
    • Select "HTML script" gadget 
    • Now paste the code copied here
    • Click on "Save"
    • And click "Save Arrangement" button at the top of the layout window
    Now, your blog will have the widget of "Fan Page Like Box" at the place where you selected the gadget. You will get the details of the fan page like the name of the fan page, how many likes etc.


    Recently announced about the changes to be made for "Like" and "Share" buttons. These two will be seen besides each other for making any website or article more shareable for traffic generation.

    More details you will get at : "Like and Share buttons to get a fresh new look".


    Wednesday, October 23, 2013

    10 ways to declutter your Facebook News Feed

    Be The First To Comment
    How many times do you share other pages, or like their pages? When was the last time you really have seen that your Facebook News Feed is de-cluttered and needs to be cleaned unwanted items or feeds? 

    Every time you see any impressive page or interesting thing, we naturally share and it gets shared on your News Feed. Sometimes, your unwanted friend requests are always displayed in the notifications area which you have not yet seen!!!!!


    Messy News Feeds have to be always cleaned and decluttered when it is not needed.

    There are different ways you can keep unwanted stuff away from your News Feed. Once you log in to your Facebook account in the morning, literally it feels messy when unwanted things are displayed. Instead of using the fact, "A stitch in time saves nine", the things are left unchanged. These pile up and bring more and more unwanted stuff to your feeds. 

    Better to keep them away and watch and go through a clean and tidy feed experience. 

    To declutter your News Feed, 
    • Unsubscribe from people you are not interested in watching.
    • Uncheck  the items that are not interesting for you without un-friending your friend with "I don't want to see this" option 
    • Improving your News Feed experience by taking a survey
    • Check for any "Fake" profile in your account
    • Use "Sorting" feature for sorting recent updates
    • Use Facebook Security options
    • Categorize your friends lists in "friends" or "Acquaintances" or "Family" etc
    • Unsubscribe from unwanted posts by selecting which type of updates you want to see in your feed.
    • Un-follow posts you are following that are not interesting now
    • It is useless to follow a friend who has already "Unfriended" you in his or her friends' list. So better watch who has removed you from their list of friends and then decide.
    Decluttering your Facebook feeds will give you a better experience of using the social networking. 


    Tuesday, October 22, 2013

    Create "Static iFrame" tab in Facebook

    Be The First To Comment
    If you own a Facebook fan page, then there should be some more information about the page you admin. Like polls, contests, videos, tweets,  your Pinterest pins, etc. This relates to some more tabs on your fan page. There is a facility to add these tabs on your page.

    Your present fan page is a page which has text , images , links, videos, likes and comments. Now if you want to add some more stuff to engage in your visitors and fans and stick to your fan page to look for some more updates, then there should be "Custom Tabs" that should be installed. 

    The "Tabs" can be installed with the help of "Static iFrame" tab in Facebook. 
     

    Designed by WooBox, you will get a new set of tabs that can be installed in your Facebook page. If you are the "Admin" of that page, set some different types of tabs that will display more stuff about your fan page in details. 


    These "Tabs" are nothing but your "Promotional Apps" on page. Different types of tabs that you can add to your page are, polls, contests, coupons, sweepstakes, deal, group deal, rewards, etc. 

    Your page visitors will also enjoy visiting your page again and again if tabs like polls, contests and fresh content is frequently added. 

    So to engage more fans to your page, add some tabs with the use of "Static iFrame " tab or app.

    If you want your Twitter feeds also to display when a user wants to know your recent tweets, then you can add this custom tab to your page too. 

     
    To create a "Static iFrame " Tab in Facebook, all you need :
    • A Facebook Fan Page
    • You should be "Admin " of that page
    • You should know how to use "Graph Search" option in Facebook
    When you have all these ingredients ready with you, then you can start with your mission of creating iFrame tabs on fan page.

    Steps to add or create an iFrame Tab in Facebook are :

    • Log in to your Facebook account
    • Go to your fan page 
    • Either by using "Graph search" you can type "Static iFrame Tab" which will lead you to the installing of the tab or directly you can type "Woobox.com" in your new browser tab and then follow the instructions.
    • To start creating and adding tabs, first grant the permission to Woobox.com to access your details. 
    • If you have used "Graph Search" then directly go to the app and click "Install Page Tab" and this will direct you further to "Add Page Tab" and choose the fan page where you want to add tabs.
    • Choose the fan page from the drop down list and click the button.
    • Then change the settings in "Tab Settings"and click "Save Settings" . This will add the type of tab to your page. 
    You can see the tab added besides the "About section" of the page. 


    The process of adding static iFrame tabs will be made more easier when you directly go to "WooBox.com" website and select the type of tab that has to be added.


    Tip #27 - How to : Hide Facebook Likes

    Be The First To Comment
    like thumbs up pic
    It comes a time when we all like a facebook page of an artist, a group etc. and we don't want our friends or the public to find out. Well, of course there is a solution to hide those embarrasing likes from your profile. I found this trick over at lifehacker's(if you don't know this site, I seriously suggest you to visit it; it has all these killer life hacks; it's really cool) website and is really handy. Read the tip below.
    Follow this simple guide:

    1. Log into your Facebook account.
    2. Go to your Likes page and click the edit option.
    3. Remove the like you don't want others to see from the category it currently resides by clicking the "X" that shows up while hovering.
    4. Now, find another category you don't use and change its privacy setting to "Only Me" as shown in the picture below.
      only me like option pic
      Select "Only Me" option to make the category private.
    5. Simply add your like to the category you set as private.
    Done, now only you can see your embarrasing likes.


    (Updated on October 22nd)
    The above tip doesn't seem to work now, as Facebook updated some of these settings. However, I figured out some possible solution similar to the aforementioned.
    1. Log into your account.
    2. Go to the Likes page.
    3. Set a category you don't use to "Only Me".
    4. Now, the part that might or might not work. While being on the private category, search for the page you want to like using the search box above suggestions. It's really important to use this search box and not Facebook's Graph Search.
    5. If you are like and you do find the page you want click it and it will be added to the private category. 
    This way you will continue to receive updates on your news feed, but your friends won't know you like this page.

    Hope you found our trick interesting. Comment below and have fun.

    Monday, October 21, 2013

    Launch of a new tool by Facebook - "Stories to Share" for Publishers

    Be The First To Comment
    A new tool, "Stories to Share", has been launched by Facebook recently. The objective is to make publishers and media sites engage more viewers on their fan page. 

    The publishers' Facebook fan page will suggest content from their sites that they may wish to share with their followers. This tool will appear in the "Insights" section on the fan page. Insights is a tool which displays the graph of your page visitors. 

    The "Stories to Share" tool will share the news and stories from the sites of the publishers in their fan pages. This will make a big impact for their customers to engage more on their stories and other news. 
    According to Simple Reach, Facebook is the largest driver of social traffic.


    The news or stories from media sites will be shared on their Facebook Fan page. At present this tool is in the test mode and will be soon implemented. This is another major tool that will drive more traffic to news and publishing sites. 

    For example, CNN.com will suggest its most happening news or stories on their Facebook Page to let their visitors know what is the latest news and latest happenings.
    To share the news to more people, the tool "Stories to Share" will share or suggest the latest feed in the Insights Dashboard of fan page of any publishing site if they are the "Admin" of that page.
     

    © 2015 Facebook Tips and Tricks 2016 - Designed by Mukund | ToS | Privacy Policy | Sitemap

    Hide
    X